One of the things I enjoy most about working in the Power Platform community is that you never stop learning — and sometimes that learning comes from a quick conversation with a colleague rather than any documentation or course.
I recently found myself chatting with a colleague when they mentioned something that immediately caught my attention: the 3-environment limit on the Power Apps Developer Plan isn’t a tenant-wide limit. It’s a per-user limit. That distinction changes everything.
If you followed my earlier guide on setting up your own Azure Tenant and Power Apps Developer environment, you’ll know that the free Power Apps Developer Plan gives you up to three developer environments to play with. For most people starting out, that’s plenty. But as you take on more projects — separate environments for learning, testing, building portfolio pieces — three fills up quickly.
The good news? You can work around this, and I’ve tested it myself to confirm it works.
How the Limit Actually Works
The Power Apps Developer Plan caps environments at 3 per user account, not per tenant. This means that if you create an additional user within your Azure tenant and assign them the appropriate licence, they get their own allocation of 3 environments — separate from yours.
As a Global Administrator (or with the Power Platform Administrator or Dynamics 365 Administrator role), your main account can see and access all environments across the tenant from the Power Platform Admin Center. So while the environments are technically created under a different user, they’re fully visible and accessible to you.
What You’ll Need
- An existing Azure tenant with your main Global Administrator account (the one you set up following the original guide)
- About 15–20 minutes
Step 1: Create a New User in Entra ID
Head into Microsoft Entra ID and create a new user account. This is the same process covered in the original setup guide — if you need a refresher, Microsoft’s documentation on creating users walks through it clearly. Give the account a logical name so you can identify it easily (something like devuser2@yourdomain.onmicrosoft.com works fine).
Step 2: Assign the Microsoft Power Apps for Developer Licence
All the new user needs to create environments is the right licence — no admin role required. Within Entra ID, open the new user account and navigate to Licences. Click Assignments, find Microsoft Power Apps for Developer, and assign it.
Because your tenant already has Power Apps through the Developer Plan, the licence is already available to assign to additional users without any additional sign-up process.
Note: You may be prompted to set a new password on first login for the new account. Make sure to store this securely — and as with any account, set up multi-factor authentication where possible.
Step 3: Verify the Environments from Your Main Account
The new user can now log into the Power Platform Admin Center and create up to 3 developer environments under their own allocation. Once they’ve done that, switch back to your main Global Administrator account and open the Power Platform Admin Center. Head to Environments and you should now see all environments across the tenant — including the ones created by your new user.
From here, you can access, manage, and work within those environments just as you would your own.
A Few Things Worth Keeping in Mind
- Each developer environment is tied to the user who created it. If you were to delete that user account, those environments would be affected — so treat the secondary account as a persistent part of your tenant setup, not a throwaway.
- This isn’t a hack or an exploitation of anything — it’s simply how the licensing model works. The limit is per user, and multiple users can coexist on the same tenant. You’re just making use of what’s already available to you.
- There’s nothing stopping you from repeating this process to add further users and environments as your needs grow, within reason.
The Result
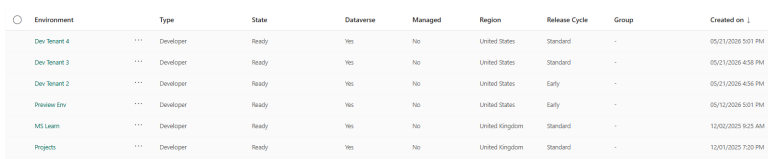
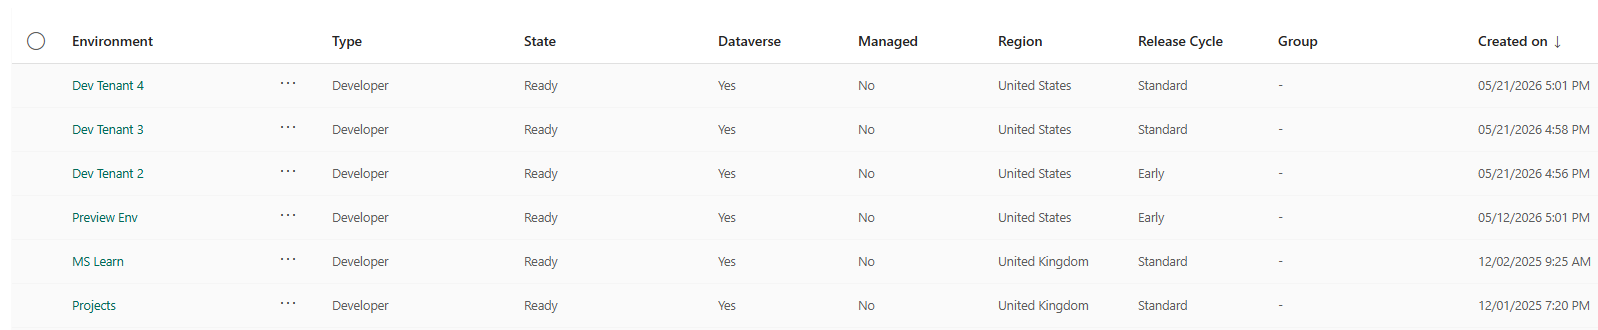
As you can see from my own tenant, I now have 6 developer environments available — 3 under my main account and 3 provisioned through a secondary user. All are visible and accessible from my Global Administrator account.
It’s a small thing, but it’s a great example of why talking to other people in the community pays off. I’d been working with that 3-environment limit as if it were a hard ceiling — and it simply isn’t.
If you haven’t already set up your own Azure tenant and Developer Plan, check out my original setup guide first, then come back here to expand your setup.